programming coffeescript isomorphic react flux javascript
From Modern C++ to Modern Web Applications 3: ObeseBird UI
Read the previous articles in the serie here: Part 1, Part 2
Here comes the fun part where we actually do code something!

(Picture from Ghost In The Shell)
Our objectives
What we're trying to achieve is quite simple on paper: develop a front-end for an example app (a tweets scheduler) that will work well with our upcoming backend. We have the following constraints:
- Should display something when javascript is turned off
- => Use an isomorphic engine.
- This makes the pages pre-render on a Node server before sending them to the client
- Search engines can then actually index the content of our site.
- Should be well organized
- => Use a Flux+React based code organization.
- Every piece of code should have a place to go, so newcomers can improve it easily
- Encourages code reuse via generic components
- Should not force us to write a lot of Javascript
- => We'll use CoffeeScript instead
- Although it is sometimes needed to read Javascript, we don't need to learn everything about it before starting. I like Mozilla's language reference when I need to check something out.
- Should be testable without the back-end
- => Use hard-coded test data
- Developing the front-end first is a way to not be tempted to skip those tests.
I know there are many alternatives to CoffeeScript: TypeScript, Dart, ClojureScript, etc. I will personally have a closer look at ClojureScript since I like Lisp-inspired languages a lot. But I figured that CoffeeScript would be the best choice for C++ developers that don't want to spend too much time on learning a new language, and easily find examples on the web.
Introducing ObeseBird
The purpose of our super cool app ObeseBird is to let us populate a library of tweets sorted by categories. Then schedule when a tweet in a given category should be published, so that the backend can work on these publications for us without our supervision. This way the bird is always fed with content. Obviously, we'll also need a repost limit, or else our marketing efforts could turn into ugly spamming, but we'll fine-tune this detail when dealing with the back-end.
We'd like to keep it minimal for now, so we'll just focus on the library and schedule part first, and secondary features like editing the names of the available categories or configuring our twitter account from the interface will be left aside.
Here is a quick overview of the expected outcome:
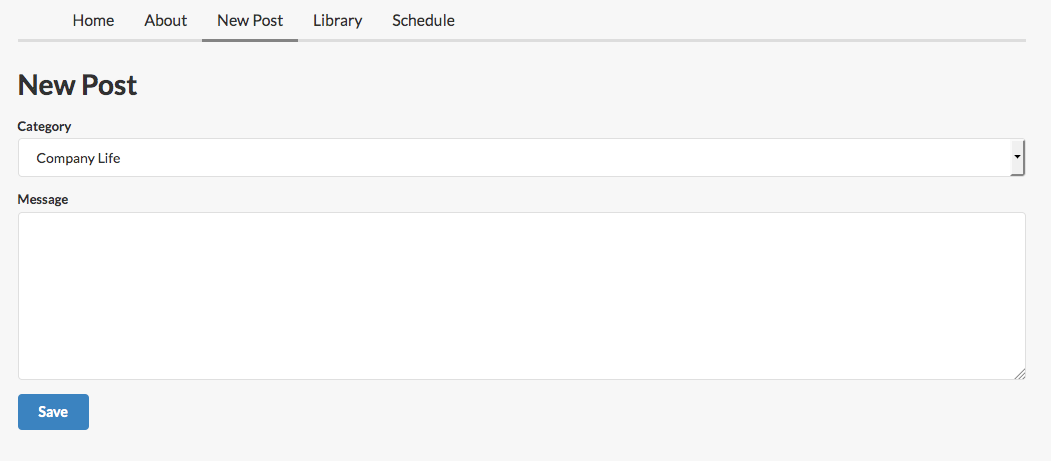
Creating content
First we'd like a very simple way to pick a category and enter the text of our message. Nothing fancy.
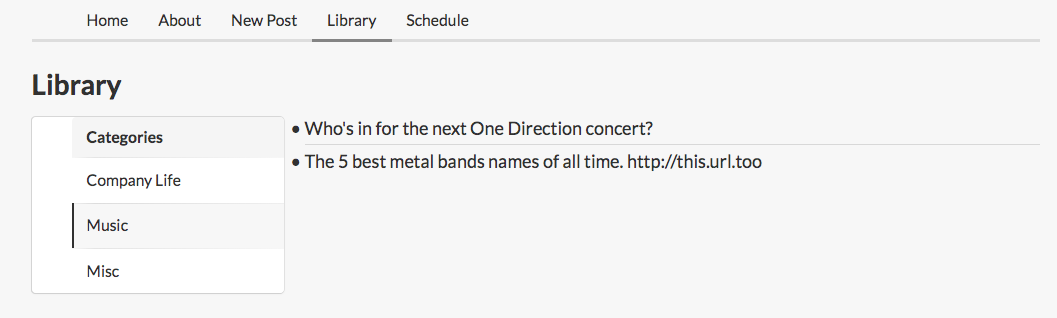
Browsing existing content
Then we want to be able to have a look at our library of posts (/tweets) in each category.
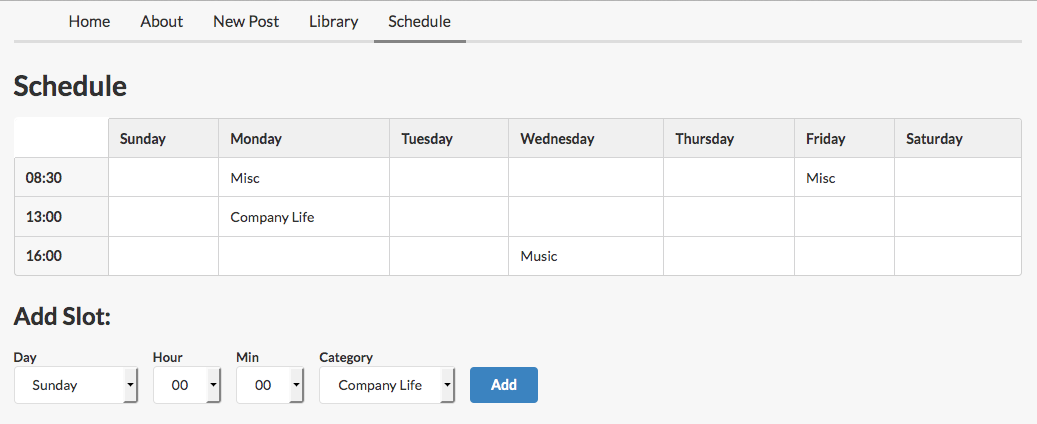
Organizing content publication
Finally, it wouldn't be complete if we couldn't give instructions on how to organize our posting schedule.
Project structure
As I mentioned before, we're going to use Yahoo's "Fluxible" libraries to get a complete toolkit for our Flux application. One way to build a Fluxible app is to let the command line tool "Yeoman" (famous amongst Javascript developers) generate a stub for us.
{% highlight bash linenos %} $ npm install -g yo generator-fluxible $ mkdir obesebird && cd obesebird $ yo fluxible {% endhighlight %}
I wish I was the one to come up with the idea of a "yo" tool... Anyways, this creates a structure of .js files corresponding to actions, ui components, router configuration, stores, client bootstrap and server launch.
Once translated to coffescript (except the React components, because I'm lazy), this looks exactly like that:
{% highlight bash %} $ tree . ├── Gruntfile.coffee ├── actions │ └── loadPage.coffee ├── app.coffee ├── client.coffee ├── components │ ├── About.jsx │ ├── Application.jsx │ ├── Home.jsx │ ├── Html.jsx │ └── Nav.jsx ├── configs │ └── routes.coffee ├── package.json ├── server.coffee └── stores └── ApplicationStore.coffee {% endhighlight %}
I also updated the content of Gruntfile.coffee to translate .coffee files to .js when packaging our application. You can have a look at it in the project's repository on Github.
Now running grunt should do all the required translations, bundle the client code and its dependencies to a single file, and run a Node instance to serve our application on http://localhost:3000. Don't expect anything fancy yet, it just contains a "Home" page, an "About" page, and a navigation menu. I added the stylesheet you see on the screenshots above much later, you should probably do the same and focus on the functionalities first.
Let's start the development by trying to add a new page.
Into the wild
Listing the posts
The first thing we would like to do to get a better grasp on all this, is add another page. This new page will display the list of existing posts. This also means we need some fake data to populate this page. Luckily, Fluxible also provides a plugin called Fetchr, which allows the declaration of services and lets us specify how to actually fetch the data. Here we'll simply take it from an hardcoded JSON array.
Posts service
Create a new services directory and a posts.coffee file inside:
{% highlight coffeescript linenos %} _posts = [ { id: '1' categoryID: '1' text: 'Checkout out our latest product FooBarBaz #awesome' creationDate: Date.now() - 99999 lastSubmissionDate: null isQueued: false } { id: '2' categoryID: '1' text: 'Company Hackathon will take place next week http://check.this.url' creationDate: Date.now() - 89999 lastSubmissionDate: null isQueued: false }
...... more posts
]
_genId = -> nextId = 1 + parseInt _posts[_posts.length - 1].id nextId.toString()
module.exports = name: 'posts'
read: (req, resource, params, config, callback) -> callback null, _posts
create: (req, resource, params, body, config, callback) -> _posts.push id: _genId() categoryID: params.categoryID text: params.text creationDate: params.creationDate lastSubmissionDate: params.lastSubmissionDate isQueued: params.isQueued callback null, _posts {% endhighlight %}
Which is just a static array of test posts data, and an exported structure defining:
- the service's name,
- a
readmethod that simply returns the array, - and a
writemethod that generates an incremented id number, assigns it to the new post, and pushes the post into the array, before returning the mutated array.
Notice the first null argument to callbacks. It is a wide-spread javascript idiom to consider the first argument to callbacks as the error object.
Using this service requires some declarations in app.coffee and server.coffee.
{% highlight coffeescript linenos %}
app.coffee
...
fetchrPlugin = require 'fluxible-plugin-fetchr'
...
app.plug fetchrPlugin(xhrPath: '/api')
...
{% endhighlight %}
And a little bit more setup is required in server.coffee:
{% highlight coffeescript linenos %}
server.coffee
...
express = require 'express' favicon = require 'serve-favicon' bodyParser = require 'body-parser' cookieParser = require 'cookie-parser' csrf = require 'csurf' serialize = require 'serialize-javascript' navigateAction = require('flux-router-component').navigateAction React = require 'react' app = require './app'
htmlComponent = React.createFactory(require('./components/Html.jsx'))
server = express() server.use favicon(__dirname + '/favicon.ico') server.set 'state namespace', 'App' server.use '/public', express.static(__dirname + '/build') server.use cookieParser() server.use bodyParser.json() server.use csrf({cookie: true})
Get access to the fetchr plugin instance
fetchrPlugin = app.getPlugin 'FetchrPlugin'
Register our messages REST service
fetchrPlugin.registerService require('./services/posts')
Set up the fetchr middleware
server.use fetchrPlugin.getXhrPath(), fetchrPlugin.getMiddleware() server.use '/public', express.static(__dirname + '/build') server.use (req, res, next) -> context = app.createContext req: req # The fetchr plugin depends on this xhrContext: _csrf: req.csrfToken() # Make sure all XHR requests have the CSRF token
...
{% endhighlight %}
The most important part here is the registration of the service with the fetchr plugin. The rest is required for security reasons. XHR stands for XmlHttpRequests, which are the asynchronous calls that your browser code makes to query the server for data dynamically. These requests can be subject to man-in-the-middle attacks, so they need to be protected by a unique token system (CSRF).
Posts flow
Now the real business. Let's extend the routing:
{% highlight coffeescript linenos %}
routes.coffee
loadPage = require '../actions/loadPage' loadPosts = require '../actions/loadPosts'
module.exports = home: path: '/' method: 'get' page: 'home' title: 'Home' action: loadPage about: path: '/about' method: 'get' page: 'about' title: 'About' action: loadPage posts: path: '/posts' method: 'get' page: 'posts' title: 'Posts' action: (context, payload, done) -> context.executeAction loadPosts, payload, -> context.executeAction loadPage, payload, -> done() {% endhighlight %}
The navigation mechanisms already in place in the Fluxible application stub will pick up on this, and automatically add a new menu item to navigate to the /posts url. And when going to that url, 2 actions will be triggered: a new one, loadPosts, and the already existing loadPage.
The main Application.jsx component that is rendered when displaying any page of our application will need to be slightly modified to render a new PostsLibrary component right under the navigation bar when requesting that url.
I will not dive into the JSX syntax, since all new components will directly be written in coffeescript.
{% highlight javascript linenos %} // Application.jsx // ... var PostsLibrary = require('./PostsLibrary.coffee'); // ...
switch (this.state.currentPageName) { case 'home': output = {% highlight coffeescript linenos %} PostsStore = require '../stores/PostsStore' fetchPosts = (context, payload, done) -> context.service.read 'posts', {}, {}, (err, messages) -> if err context.dispatch 'RECEIVE_POSTS_FAILURE', messages else context.dispatch 'RECEIVE_POSTS', messages done() module.exports = (context, payload, done) -> postsStore = context.getStore PostsStore if Object.keys(postsStore.getAll()).length == 0 fetchPosts(context, payload, done) else done() {% endhighlight %} This action simply reads posts data from our newly created service if needed. The {% highlight coffeescript linenos %} createStore = require 'fluxible/utils/createStore' module.exports = createStore storeName: 'PostsStore' handlers: 'RECEIVE_POSTS': 'receiveMessages' initialize: (dispatcher) -> @messages = {} receiveMessages: (messages) -> for message in messages @messages[message.id] = message @emitChange() getAll: -> @messages get: (id) -> @messages[id] dehydrate: -> messages: @messages rehydrate: (state) -> @messages = state.messages {% endhighlight %} The The other methods are just getters, initializers or serialization/deserialization functions. Of course, calling it serialization, or marshalling, like the rest of the world, would have been too easy and consistent, so I'm guessing that's why they decided to call it dehydrate/rehydrate... Finally, if you followed the Flux flow so far, you should be able to guess that the view should be the Store's observer: {% highlight coffeescript linenos %} React = require 'react' PostsStore = require '../stores/PostsStore' FluxibleMixin = require('fluxible').Mixin {ul, li, a, div} = React.DOM module.exports = React.createClass mixins: [FluxibleMixin] statics: storeListeners: [PostsStore] getInitialState: -> @getState() getState: -> msgStore = @getStore PostsStore { posts: msgStore.getAllForCurrentCategory() } onChange: -> @setState @getState() render: -> div null, ul className: "ui big divided list" for post in @state.posts li className: "item" key: post.id a href: "/posts/#{post.id}" post.text {% endhighlight %} If you're not familiar with what a Mixin is, it is just a code factorization mechanism similar to what private inheritance would do to your C++ class. Meaning that you will inherit the properties and methods of the Mixin, but there is no typing mechanism involved. It is pretty common in other languages like Python or Ruby. Here, the Then, when its Since React uses a Virtual DOM to manage our document structure, we also need to import the functions used to create common HTML nodes like If you compare what we've implemented here with the Flux flow that I exposed in my previous post, you can see that we respected the our part of the deal: The setup forced us to write a certain quantity of boilerplate code. If you think about it, it's not that dramatic in comparison to what we were used to do in C++98 (e.g. writing default constructors, forbidding copy, initializing static members, filling vectors with 10 calls to push_back(), etc.) and coffeescript makes it readable enough. Now I think it is important for you to try to code the rest all by yourself. Even though several bits were improved in later commits, the repository history still is an interesting reference for incremental changes. I was also greatly inspired by the existing examples, so check them out as well. Here is what I did, more or less: This one is a bit more complex Once you're done, try disabling Javascript in your browser, and notice how the buttons stop functioning but the page still renders with its initial content. You can also clean you're code up a bit, and change the CSS to ensure it displays well on mobile (using Firefox's Responsive Design View tool). I hope this example helped you understand the combination of a Flux architecture with React views. I'm not claiming the code in this repo is perfect, of course, so if you have any remark, let me know in the comments. Or even better, submit a pull request! Also, give me a shout if you need more details about how to implement the schedule or post creation view. You probably noticed I didn't mention any unit-test or functional testing code... Sorry about that, I didn't find any satisfactory way to test this architecture yet. Plus I found that this tutorial was already long enough. I'll try to figure something out for a future post. As we'll see in upcoming articles, the backend part will be much faster to code and more elegant. The Elixir language that we'll use relies on the Erlang VM, which has been around for decades and is so lightweight it's able to run on embedded systems. I've recently read about people willing to create ElixirScript, an equivalent of ClojureScript that would be translated to Javascript. This way we could have very similar code bases on the front and back-end. I'm really looking forward to this. Coffeescript is not that big a deal, but the metaprogramming abilities of Elixir would allow us to drastically reduce the total number of LOCs in our subsequent project. ([See the next article in this serie here!]({% post_url 2015-04-07-intro-to-elixir %}))loadPosts.coffee
RECEIVE_POSTS action it dispatches will be received by a PostsStore which we will create now.PostsStore.coffee
RECEIVE_POSTS event is declared to be handled by receiveMessages, which simply updates its internal messages structure, mapped by id. The @emitChange() function will tell its observers that something has changed.FluxibleMixin implements the observer pattern for us. So we just declare that PostsStore is in the list of classes to listen to, and the rest will happen automatically. When the store changes, the onChange method will be called by default. We use it to update the state of the component.render function is called, the state is up-to-date and contains all the data we need to iterate over in order to display a list of posts.div, li or a.Flux flow reminder
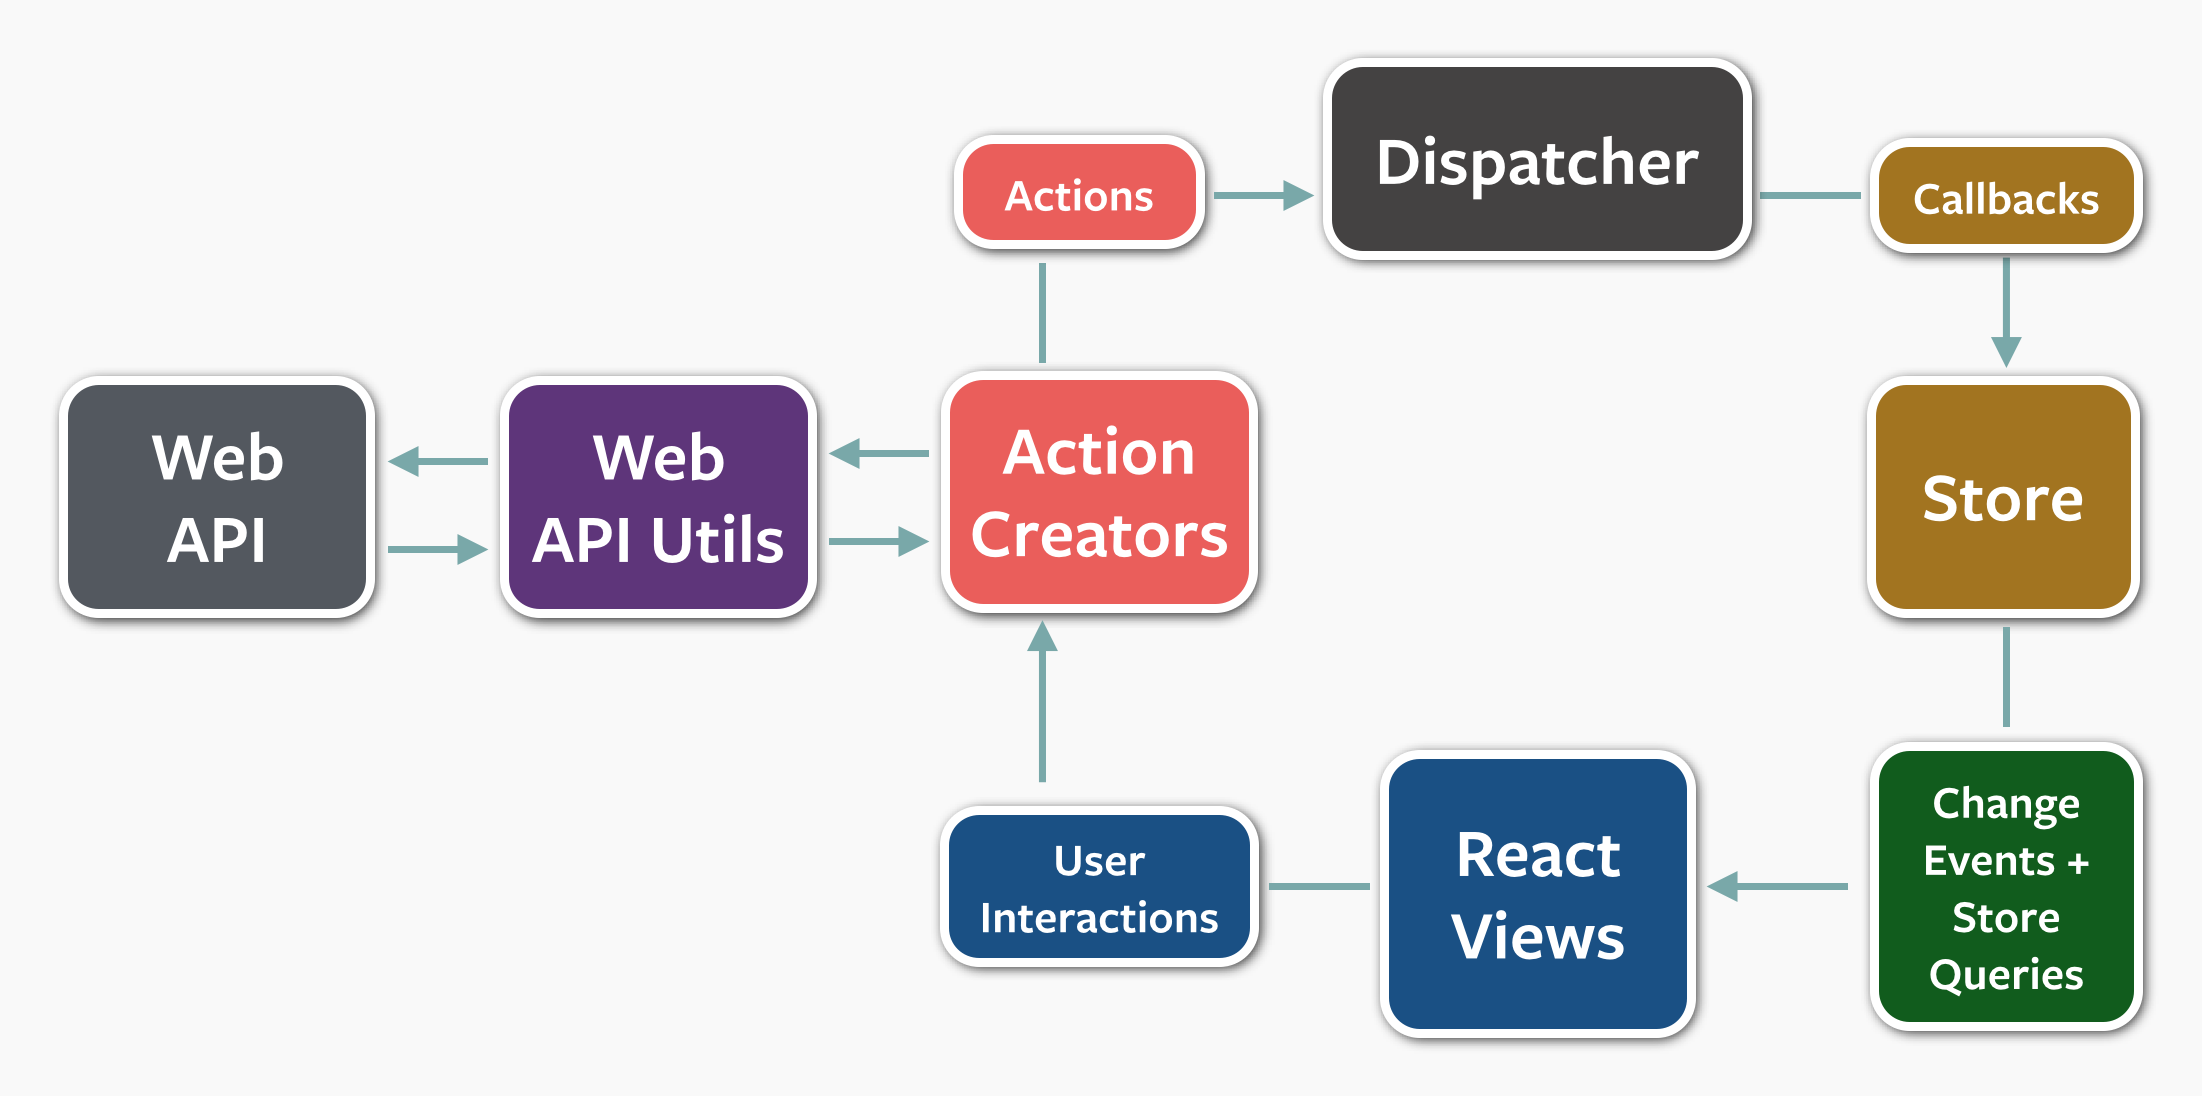
/posts route launches the loadPosts actionRECEIVE_POSTS eventreceiveMessages callback in the PostsStorePostsLibrary component queries the store to display accurate posts dataNext Steps
Categories
CategoryStore being fed by a service similarly to what was done with the posts.PostsStore and getters that return all the posts in a given category.PostsLibrary to display 2 sub-components: Posts and CategoriesListopenCategory action that is triggered when clicking on a category in the aforementioned Categories List.Create new post
/posts/new route should display a new component, PostComposerCategoryStore, a text area, and a button which will trigger the createPost action.create method.Scheduling
TimeSlot service. Timeslots are just a day and time of publication associated with a category IDScheduleStore. It maintains an internal data structure which sorts the timeslots by time. I found it easier to manipulate when trying to display a schedule in the form of a tableSchedule view that should be displayed when navigating to /schedule is composed of a ScheduleTable and a SlotCreatorScheduleTable looks complicated but it's mostly formatting workSlotCreator could be factorized. It just displays a bunch of drop-down menus and triggers the createTimeslot action when clicking AddcreateTimeslot action is a copy-paste of createPost, and loadSchedule, a copy of any other loadXXX action. In another language, I would have templatized the shit out of these files...The future